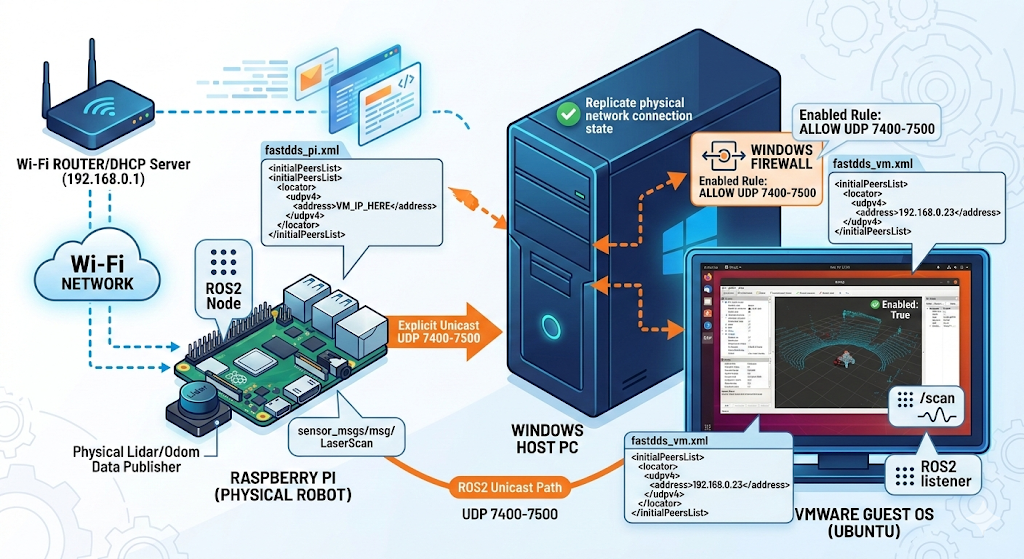
Solving ROS2 Discovery Issues in VMware Bridge Environments
When working with ROS2 Humble in a mixed environment involving a physical Raspberry Pi and a VMware Guest OS (Ubuntu), the default Multicast-based discovery often fails due to Wi-Fi bridge limitations or host firewalls.
This post details how to bypass these issues using FastDDS Unicast (Initial Peers) and Windows Firewall configuration.
1. The Problem: Multicast Silently Dropped
In a typical Wi-Fi Bridge setup, the “discovery” packets (Multicast) sent by ROS2 nodes are frequently dropped.
- Symptoms:
ros2 topic listis empty. - Cause: Routers or VMware Bridge adapters often filter out IGMP/Multicast traffic.
2. The Solution: Explicit Unicast (Initial Peers)
We can force ROS2 to use Unicast by providing an explicit list of IP addresses.
Creating the XML Configuration
Create a fastdds_profile.xml on both machines.
On Raspberry Pi (e.g., 192.168.0.23):
1
2
3
4
5
6
7
8
9
10
11
12
<?xml version="1.0" encoding="UTF-8" ?>
<profiles xmlns="[http://www.eprosima.com/XMLSchemas/fastrtps_profiles](http://www.eprosima.com/XMLSchemas/fastrtps_profiles)">
    <participant profile_name="unicast_profile" is_default_profile="true">
        <rtps>
            <builtin>
                <initialPeersList>
                    <locator><udpv4><address>192.168.0.XX</address></udpv4></locator>
                </initialPeersList>
            </builtin>
        </rtps>
    </participant>
</profiles>
On VMware Ubuntu:
1
2
3
4
5
6
7
8
9
10
11
12
<?xml version="1.0" encoding="UTF-8" ?>
<profiles xmlns="[http://www.eprosima.com/XMLSchemas/fastrtps_profiles](http://www.eprosima.com/XMLSchemas/fastrtps_profiles)">
    <participant profile_name="unicast_profile" is_default_profile="true">
        <rtps>
            <builtin>
                <initialPeersList>
                    <locator><udpv4><address>192.168.0.23</address></udpv4></locator>
                </initialPeersList>
            </builtin>
        </rtps>
    </participant>
</profiles>
Applying the Configuration Add the following to your ~/.bashrc to make it persistent:
1
export FASTRTPS_DEFAULT_PROFILES_FILE=~/fastdds_profile.xml
3. Configuring Windows Host Firewall
The Windows Host might still block incoming UDP traffic to the VM. Use PowerShell (Admin) to open the necessary DDS ports:
PowerShell
1
New-NetFirewallRule -DisplayName "ROS2_Unicast_In" -Direction Inbound -Protocol UDP -LocalPort 7400-7500 -Action Allow
4. Verification
After rebooting all devices, verify the connection:
1
2
3
4
5
6
7
# Running on VMware Ubuntu
ros2 topic hz /scan
Result:

Plaintext
average rate: 5.850
min: 0.080s max: 0.321s std dev: 0.05819s window: 54
Success! The Lidar data is now streaming perfectly.
5. Troubleshooting & Maintenance
Common Issues and Solutions
- IP Address Mismatch: If your communication stops after a reboot, verify the IP addresses. If the DHCP server (router) assigns a new IP to the VM, you must update the
<address>tag in the Raspberry Pi’sfastdds_pi.xmlfile.- Check IP:
hostname -I
- Check IP:
- Firewall Status: If the VM is not receiving data, ensure the Windows Host firewall rule is still enabled.
- Check Rule (PowerShell Admin):
Get-NetFirewallRule -DisplayName "ROS2_Unicast_In" | Select-Object Enabled
- Check Rule (PowerShell Admin):
- XML Loading Failure: If you see
[XMLPARSER Error], double-check the file path in your~/.bashrc.- Command:
cat ~/.bashrc | grep FASTRTPS
- Command:
Essential CLI Commands for Quick Testing
To verify the connection between the Raspberry Pi and VMware, use these standard ROS2 commands:
1. Basic Connectivity Test
1
2
3
4
5
# Terminal 1 (VM)
ros2 run demo_nodes_cpp listener

# Terminal 2 (Pi)
ros2 run demo_nodes_cpp talker